
Click on the images to enlarge them!
Cross Stitches
Today, cross stitches are usually done on a counted, eaven-weave fabric, such as Aida, Jobelan, counted linen, cotton and the like, where the warp and the weft threads are of the same size, and there are visible "holes" between them. This implies, that stitches of the same "count" (hence "counted work"), i. e. crossing the same number of fabric threads, will all have the same length and width. Cross stitch is mostly done with two threads of floss in a tapestry needle. Tapestry needles have a blunt tip, so that they don't snag on the fabric threads or even split them.
The little crosses are most commonly stitched over 2 threads of fabric. They can be larger or smaller, though, depending on the count of the fabric and the specifics of the design. So, in canvaswork/needlepoint, for example, you generally stitch half crosses (called tent stitch in this technique) over 1 thread only. Always make sure, that the thread lying on top of the cross is always pointing in the same direction.
Simple Cross Stitch
Deutsch | Kreuzstich |
English | cross stitch, sampler stitch |
Español | punto de cruz |
Français | point de croix, point de marque |
Italiano | punto croce |
Magyar | keresztszemes |
Nederlands | kruissteek |
Polski | ścieg krzyżykowy |
Português | ponto de cruz |
Pусский | шов крестиком |
Svenska | korsstygn |
There are two main ways of doing the cross stitch.
The first one, called single cross stitch, is based on working every single cross individually. You can put in the half stitches as you see fit; the diagram below shows just the way I use to work it. The only important rule is, as mentioned above, that the lines on top of each cross always point in the same direction.


The second way, the actual counted cross stitch, is based on stitching a whole row of the lower diagonal lines first, then going back, crossing them with the top lines in the opposite direction.


Apart from this full cross stitch, there are a couple of partial variations to it, such as ...


These variations are often used to create more detail in a cross stitch pattern, to add a sense of depth or to work specific shapes, corners or circles.
References:
Nordic Needle. Cross Stitch (and variations)
the spruce Crafts. 5 Basic Stitches in Cross Stitch
Pumora Embroidery. 7 days of stitches: cross stitch
Mary Thomas's Dictionary of Embroidery Stitches
Long-Armed Cross Stitch
<<< mobile phones: drag the table to the left to see the whole entry <<<
Deutsch | Wiener Flechtstich, langarmiger Kreuzstich |
English | long-armed cross stitch, long-legged cross stitch, plaited Slav stitch, Portuguese stitch, twist stitch |
This cross stitch variation is popular in Assisi embroidery, but it can be used for borders or textured fillings as well. It results in a nice plaited line. Therefore, to work it correctly, it isn't possible to first stitch a row of half cross stitches, crossing them with the upper diagonal on the way back, because all the diagonals have to interlace with each other.
Nordic Needle shows three versions of working the long-armed cross stitch in their stitch dictionary. One starts with a normal full Cross Stitch, the second with the first long arm, and the third adds a little compensational stitch at the beginning and end of each row. In Mary Thomas's Dictionary of Embroidery Stitches, you will find only the open second version. I used the first version in my Assisi sampler, and this is what I will show here. You can easily check up the other two versions on the Nordic Needle website by following the link above.


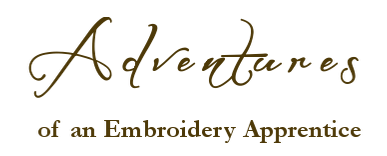
As a general rule, the end of the row remains open, that is you don't work another simple cross stitch at the end as you did at the start. However, ending a row of long-armed cross stitch at a slanted outline can prove a bit tricky, as I demonstrated in the Assisi sampler. My personal solution to this problem was as follows:
If the outline runs from top left to bottom right, I work one more simple cross stitch at the end of the row, just like I did at the beginning, plus I add a compensational quarter cross stitch where the next long arm would have supposed to be.
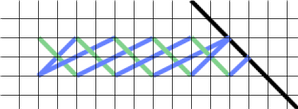
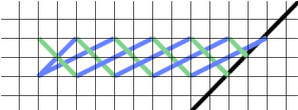
If the outline runs from bottom left to top right, the case is easier. Just work one last long arm, as you would at a vertical outline, then end the row with a quarter cross stitch, as if you would simply cut the next short arm. Admittedly this version gives a more organic look to the stitch than the former one.
For the second row, it is best to return to the left side and work it again from left to right. If you don't want to waste thread, however, you can work the second row from right to left, but you have to consider that it will result in a reversed braiding of the threads.
Italian Cross Stitch
Deutsch | (doppelseitiger) italienischer Kreuzstich |
English | (two-sided) Italian (cross) stitch, arrowhead stitch |
One more of the traditionally basic stitches in Assisi embroidery. Basically, you could call it a simple cross stitch in a box. Depending on the stitch size, it produces a quite dense and textured surface. Aside from that, it belongs to the reversible stitches, i. e. it shows a similar pattern on the backside. Applied as a background stitch in Assisi embroidery, the top line will usually get closed as well.


References:
Nordic Needle. Italian Cross Stitch
Mary Thomas's Dictionary of Embroidery Stitches
Montenegrin Stitch
Deutsch | montenegrinischer Kreuzstich |
English | (two-sided) Montenegrin (cross) stitch |
Français | point (de croix) monténégrin |
Here we have a kind of mix of long-armed cross stitch and Italian cross stitch. The individual crosses are separated by vertical lines, but they don't get bottom (nor top) lines, which results in a more open look than in the Italian cross stitch, but a more structured one than in the long-armed cross stitch. What's more, the Montenegrin stitch is traditionally used in Assisi embroidery as well.


Some add 2 and 3 resp. compensating stitches at each end when working this stitch on a straight line. As you can see, the 2 compensating stitches at the beginning are worked first, the 3 at the end are worked last.
The Montenegrin stitch doesn't raise the same trouble as the long-armed cross stitch does, when it comes to ending a line at a slanted outline. Again, I've made a diagram to show you what I mean:
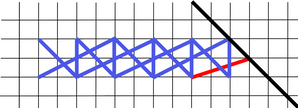
Just work the last long arm at a slightly smaller angle, so that it meets the next lower hole in the outline (e. g. over 3 threads in width and 1 thread in height). Then close the last stitch as you would normally do: one half cross stitch to the left plus one vertical stitch, both over the last long arm.
References:
EAC, Try a New Stitch - Montenegrin Stitch
Hands Across the Sea Sampler, Montenegrin stitch worked on the straight
Mary Thomas's Dictionary of Embroidery Stitches
Algerian Eye Stitch
Deutsch | algerischer Augenstich |
English | Algerian eye (stitch), star eyelet stitch |
I've dropped the numbers in the diagrams below, because the start and the sequence of working the 8 stitches doesn't absolutely matter. Just plunge each stitch in the centre of the star.


Experimenting with the arrangement of the eyelets and the kind of thread, you can produce interesting patterns and effects. Sharon Boggon presents some nice examples on Pintangle.
If you work this stitch on a plain-weave fabric, just draw a square of the desired size (e. g. on tracing paper) and mark the corners and the centre points of each line on the fabric.
Star Stitch
Deutsch | Sternstich |
English | star stitch |
Español | punto de estrella |
The star stitch looks very similar to the Algerian eye. The only difference is that instead of ending each stitch in a centre hole, you carry your thread across the centre. Work the upright crosses first, then work the simple cross stitches on top of them.


There is no hard and fast rule for the length of the individual stitches. Instead you can experiment with this stitch at your pleasure. Here are just a few examples:


You can create various intricate patterns by stringing the stars together in rows and columns with the arms of adjacent crosses sharing the same hole in the fabric. The diagram shows one example of such a pattern.
Credits for the multi-language stitch names:
agulhas da méri, Illustrated Glossary of Embroidery Stitches - 1
Dictionary of Stitches.docx - source unknown, please give me a hint, if you know something about the authorship (maybe an Italian blog?)
Mary Thomas's Dictionary of Embroidery Stitches
Pumora Embroidery, Lexikon der Stickstiche
Ateljé Margaretha, Sömsätt
Marina Pastushenko