Click on the images to enlarge them!
May - July 2019
A Bookmark for a Friend
This was my very first embroidery on linen. A friend of mine has trouble with her eyes, hence I proposed to send her a book with eye exercises. But it seemed to me, that sending nothing but a book would be a bit cheap, and I came up with the idea to add a personally embroidered bookmark.
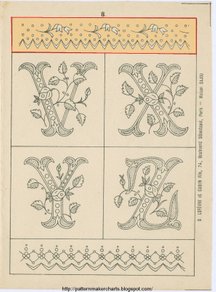
On Needle'n Thread, there are several charming free monograms. I settled for the Tulip Monogram for the initials of my friend's name. Along with it, I found a couple of jpgs with the Sajou alphabet no. 235 in my embroidery folders, which I had downloaded at some point from Patternmakercharts blog.
But that wasn't all. I wanted a two-sided bookmark with a nice self-designed motif on the backside. Looking for inspiration, I decided on a peacock feather. It's a simple motif, easy to design by yourself. And so I did.
Front Side: The Initials
My first transfer reminded me of an important fact: by ironing a design on a surface you always get a mirror image! Up to this point this had never been an issue, because all my past designs had been symmetrical, so that the arrangement of the sides didn't matter. Letters, however, are another story. Hence, if you plan to trace a motif, where the side arrangement is important, with an iron-on pen, be sure to design and print it mirror-inverted!
The fabric I used is a 50 ct. Bielefelder Leinen, a white high quality warp linen. The transfer lines came out somewhat too thick for my liking, and there were slightly blurred and even a wee bit smudged spots, but I was hoping that all this wouldn't be visible anymore at the end of the work. I had experienced on several occasions that the iron-on pencil fades out over time.
Transferred Initials
Stitching on linen was a whole new experience for me. It was difficult! This linen is very fine and densely woven, so that the needle goes through with a loud plop!, and this didn't change even after changing the needle to the next larger size. Also, it was very hard to push the needle through an already existing layer of threads, as you have to do in needlepainting, for example. It seemed not right to me, and I was thinking that I should rather have bought a 40 ct. linen - maybe a 50 ct. isn't suited for normal surface embroidery? In the meantime, Mary Corbet told me, that, on the contrary, it is usually an ideal fabric for surface embroidery. And since I use Bohin crewel needles, so that the needles can't be the reason for my trouble, I am thinking now that it is because I'm just not used to stitching on good linen. After all, I was stitching on counted fabrics only so far, which have big holes.
The thread I used was the DMC stranded cotton from my last big order for the Colbert sampler. In order to reach the free shipping limit of € 40.00, I had included two skeins of Mouliné Coloris just to see how I would like it. It is a variegated thread, but unlike Color Variations by the same manufacturer, it is composed of four contrasting colours in each skein.
The initials are done in split stitch, filled with seed stitches. The tulips decorating them are worked in long-and-short stitch in three shades of green for the leaves, stem stitch for the stem and padded satin stitch for the flowers. The padding was done in chain stitch. For the flowers I used the Coloris floss - and I have to admit that I like the effect.
Embroidered Initials
The initials took me 12 days. It was early in July, and everything was open again. I had to decide how I wanted to stitch the borders. And if I wanted them at all.
I decided that I do want them. But not the ones I used in the first pic on this page. I chose the tulip border on top of the V-X-Y-Z page of the Sajou alphabet, because it would correspond so well with the tulips in the Tulip alphabet. My idea was to place it back-to-front at either end, so that the tulips at the bottom would face downwards and those at the top upwards.
Sajou Alphabet No. 235 - Tulip Border
This one was a teeny-weeny! I had to mount the fabric in my smallest 4 inches hoop, because I was stitching at the very edge now. I encircled the little tulips in split stitch, which I worked over with satin stitch. The stems and the outlines of the leaves were done in stem stitch, the garlands in split stitch again. The whole motif was filled with little French knots.
Bottom ...
... and Top
Initially, I had been contemplating to do the garlands in satin stitch over the split stitched outlines. But as soon as the outlines were done, I decided not to fill them with satin stitch, because it would have been too much. The whole border in an open dark green design, and only the two little tulips filled with satin stitch in a contrasting colour matching the colours of the initials - that would be a subtle embellishment not competing against the basic motif.
Back Side: The Peacock Feather
After looking for inspiration for a peacock feather, I drew a stylised one and went about the transfer. I didn't want to iron it on again, so I wedged my little desk lamp in under my frosted-glass-topped table, and drew the design onto a second piece of washed and pre-shrinked 50 ct. linen, using a Copic multiliner in sepia. It went very well - it really makes a difference if you draw on bumpy Murano or on smooth linen.
Pre-drawn Peacock Feather
My plan was to work the barbules (the hairy branches) of the feather with DMC Coloris floss in stem stitch, hence I had to find three matching colours for the eye of the feather. To this end, I sketched six various colour combinations with pastel sticks onto a piece of paper. I went for the "Rastafari look": red, yellow and green.
I was initially of the mind that the innermost oval of the eye should be done in red satin stitch, that's why I outlined it in split stitch - until I realised that satin stitch would result in too long threads, which might become loose while using the bookmark. Snap decision: long-and-short stitch. In this case it was a bit unfortunate that I had already split-stitched an outline all around, but I thought it would go off all right, anyway, and I was right.
Around the innermost oval, I worked the middle one in medium green in split stitch filling - a spontaneous idea and a very good one at that, because the outermost oval was supposed to be worked in a yellow chain stitch, and so the eye would show a nice structure, increasing in size from inside out. To add a little depth, I worked the innermost row of split stitches in the green oval, adjacent to the red oval, in a darker green.
Up to this point, I was stitching with one strand of floss. The outermost oval in chain stitch, however, was done with two strands.
Peacock Feather - Eye
The DMC Coloris floss was tailor-made for the feather barbs! I really love the effect. I started with #4510, a very gaudy combination. A stretch more than halfway through, I felt like changing to #4521, a more muted blend, because I didn't want the barbs to compete against the vibrant colours of the eye.
For the shaft I used a dark brown Anchor floss. I didn't have a brown from DMC, and the Anchor was a leftover of the Biedermeier cross stitch kit. Actually, it wasn't even Anchor, but still made by MEZ Freiburg. Up to the middle, I stitched with two strands, then went over to one strand. Finally, I added a two-stranded row at the bottom of the shaft, and - the feather was done! Took me 8 days, in contrast to 18 days for the front side.
Worst Side: The Finish
Oh dear, finishing an embroidery comes still last on my popularity scale! I don't know why this is - maybe because I didn't do it that often yet, so I'm not in practice. Or maybe I'm just a bit dull when it comes to technical skills.
At first, I had in mind to fix both halves of the bookmark to a decorative piece of felt. To that end, I even bought a pair of heavy, sharp pinking scissors. But how to attach the linen to the felt? I didn't want to use glue. Yeah, I could sew them on, both at once, in Holbein stitch (for example). But the two pieces of embroidered linen had to be hemmed first, and I couldn't imagine getting a nice looking seam by forcing a needle all around through 4 layers of linen plus a layer of 3 mm thick polyester felt.
To make matters worse, the embroidery already was 5 cm wide. Adding a 0.5 cm hem on each side added up to 6 cm - in my opinion the maximum width for a bookmark. There was no place for another edging, even less a pinked one. I ditched the felt.
Later on, I noticed that a felt bookmark, even with two layers of linen on it, wouldn't do the job, anyway. I wanted a sturdy bookmark, not a flabby one. Even cardboard wouldn't be stiff enough.
After several days of thinking and searching and racking my brains, I decided without further ado that I would sew the two hemmed pieces together, put a fitted piece of plastic inside, and adorn the whole thing with a dark green blanket stitch all around.
Hemming the Bookmark
Next trial, next error. Right after sewing three sides together - two long and one short side - it turned out that leaving only a short side open for inserting the plastic was a very bad idea. For one thing turning the bookmark inside out was darned difficult. Simply because it was long and narrow. And for another thing, the corners didn't bulge out properly. Simply because they are the points, where two hems meet (4 layers of fabric, mind you), getting in each other's way.
Hell yeah! I'd better insert the plastic through the long edge ... Hence I ripped all seams open, measured, basted, folded and pressed them, and then ...
... and then I learned doing mitered corners in no time flat! Well, ok, working mitered corners on a 0.5 cm wide seam is more than fiddly, and if you don't use a sewing machine under a microscope, there's no way for them to come off perfect. But they came off well enough to turn inside out in a nearly square angle, once I sewed the edges together once more. This time leaving the long side open, of course.
What a relief, when all this was done and dusted! I ironed the bookmark, put the plastic in, sewed the last seam together as invisible as possible, and then - finally - worked a Blanket Stitch all around. It was a god-awful work around the corners. The thread just didn't want to get a grip on the corner for love nor money. That's why the corners look pretty irregular, but I decided that it'll have to do. This was as good as it could get.
The last downer was anchoring the thread at the finish. If anyone knows how to elegantly anchor a thread in a four-sided closed piece with a matching piece of plastic in it, please don't hesitate to drop me a line! I just desperately forced the thread in by the skin of my teeth, and in this place you just see threads that don't belong there. Whatever the case, it's not so bad, the bookmark looks fine all the same.
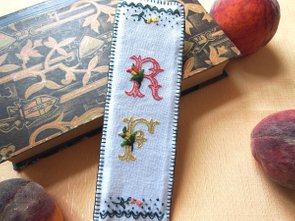
Finished Bookmark - Front Side
I have something to admit ... In the course of making this gift, I became a liar ... Yes, I admit it, and I feel ashamed. However, I do have a justification: I wished this bookmark to be a surprise gift. Just wanted to send it away together with the book, without a notice. But what would you do, when your friend is already waiting for the book, while the making of this thing takes you altogether 50 days?
As to me, I just told her I can't go and take it to the post office for the time being, because of my knee problems. That wasn't entirely a lie. I really had a stiff knee, no car and a post office half an hour walk away. But, to be honest, I would have managed.
As my friend finally got the package, she was as pleasantly surprised as I had hoped for. Now, of course, I told her the truth. She was delighted by the "delicate work". She said, she would cherish it.
As Shakespeare put it: "All's well that ends well".
😇😉
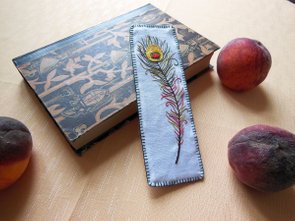
Finished Bookmark - Back Side


