Click on the images to enlarge them!
September - October 2018
Assisi Embroidery
The Assisi Work Sampler
On to my second sampler, this time in Assisi work. I didn't buy a kit (are there any Assisi kits, anyway?), because I had this wonderful book by Thérèse de Dillmont, Assisi Embroideries. You can download it for free as a pdf (it is splitted in two) from the Online-Digital Archive of Documents on Weaving and Related Topics. I decided on three designs from this book, arranged as borders, one below the other, on a long sampler. And I'd like to take you with me through the whole preparation process, because it wasn't exactly simple.
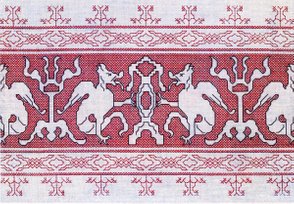
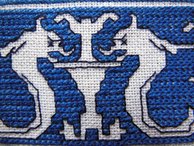
Winged Dogs Design
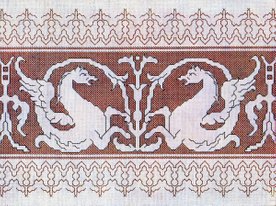
Winged Horses Design
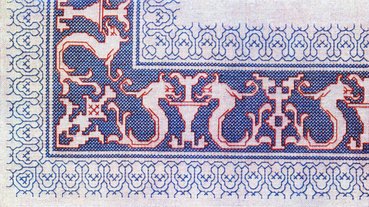
Dolphins Design
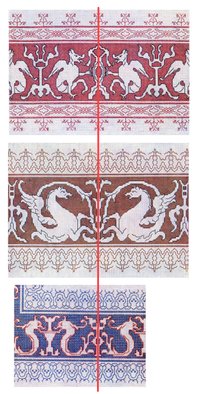
Shown above are the three motifs I chose from Dillmont's book. As you can see, the motif in the centre with the winged horses is the largest of them. That's why I wanted to put it the middle of the sampler, with the first motif (the winged dogs) above and the third (the dolphins) below. I wanted the horses to be placed with their symmetry axis exactly in the centre of the width of the whole sampler, so that the edges to the left and the right would mark the width of the other two motifs as well as of the whole sampler. The other two motifs, the dogs and the dolphins, had to be placed with their respective symmetry axis exactly on the symmetry axis of the central motif, the horses. In the end, I wanted the arrangement to look as follows:
Just imagine the bottommost motif with the dolphins expanded to the right and left to match the margins, and adapted to the shape of a border.
Unfortunately, the illustrations in the book are of different scales. This means, it was impossible to simply put them in place like I did in the above diagram - I wouldn't have known where exactly to start stitching the top and the bottom motif, as you usually don't stitch from the centre outwards, right?
Hence I had to count the crosses and convert them into centimetres. That is probably why they call it counted embroidery, in as much as the basic measurement here is the cross: a motif is composed of so and so many crosses, and the metrical size depends on the size of the crosses. (So maybe we should rename surface embroidery "measured embroidery"?) The size of the crosses again depends on the density of the fabric, i.e. a 40 ct. fabric offers space for more crosses than a 20 ct. fabric does.
Theoretical Preps: A Little Bit of Maths
Here's how I had to progress:
- I had to print out the motifs. Of course. 😉
- I had to count the horizontal crosses in the largest motif and convert them into centimetres, adding 2 x 3 cm for the margins to each side, in order to know the width of the fabric needed.
- I had to count the vertical crosses in all three motifs and convert them into centimetres, adding 4 x 3 cm for the top and the bottom margin plus the spacing between the motifs, in order to know the height of the fabric needed.
- In order to know, where each of the smaller motifs should begin and end to match the largest motif in the middle, I had to count half the number of the horizontal crosses of the largest motif within each of the smaller motifs, beginning in the centre and going to the left.
And here's how I did the conversion:
ad 2) The largest motif is composed of 126 crosses horizontally (I added one cross on each side, so as to have the outer "horn" of the flanking racks included). I will be stitching over two threads (planned to buy a fabric with at least 30 ct.). So the calculation goes as follows:
126 crosses x 2 threads = 252 threads
In a 30 ct. fabric, there's 30 threads per inch, hence: 252 threads / 30 threads = 8.4 inches
Since 1 inch is 2.5 centimetres: 8.4" x 2.5 cm = 21 cm
21 cm + 6 cm margins = 27 cm
My fabric should therefore have a width of 27 cm.
ad 3) The motif with the dogs counts 75 crosses at the perpendicular, the horses count 84 crosses and the dolphins 53. That sums up to 212 crosses in height. The conversion in cm is the same as above:
212 crosses x 2 threads = 424 threads
In a 30 ct. fabric, there's 30 threads per inch, hence: 424 threads / 30 threads = 14.13 inches
Since 1 inch is 2.5 centimetres: 14.13" x 2.5 cm = 35.3 cm
35.3 cm + 12 cm margins & spacing = 47.3 cm
My fabric should therefore have a height of 48 cm.
ad 4) Beginning on the middle axis of both of the smaller motifs, I counted 63 crosses (half of the number of crosses in the largest motif) to the left and marked the beginning in my printouts.
Yes, I know, I know *sigh* ... maths aren't exactly our favourite subject, right? But, well - just try to see it this way: this, too, is part of the stitching process, not only in counted embroidery, until you don't stitch a pre-printed kit. And believe me, this part didn't go as smoothly with me as it may seem from the calculation above. It took me several attempts, counting the crosses in the printouts and the fabric again and again, calculating over and over again, and still I wasn't sure if I didn't happen to blunder. Blunder is my middle name, you know. This time, however, Lady Bountiful seemed to have taken me under her wings, and all turned out well and fitting.
Problems Encountered
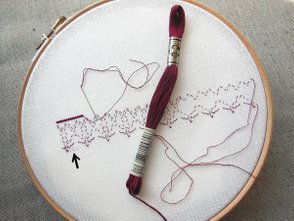
- Since my old treasure has no zigzag function, I brought my new electric sewing machine into the loop to whip the edges of the fabric. The new machine isn't actually new, it's a used one with bobbins bought separately and not necessarily for this type of machine. Learning to handle the machine was one endless frustration. I ended up with puckered edges and a skipped stitch every few stitches.
Solution: Looks as if I'm bound to stick with hand sewing? 😞 - Also right at the outset, I made a mistake and had to unstitch a row, which wasn't supposed to be covered again. How terrified was I when I saw this:
Bleeding of a Dry Thread?
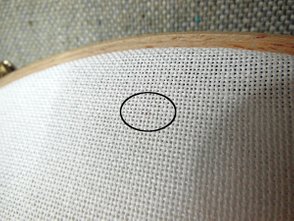
Did the dry thread bleed?! I always thought DMC is not only the most popular, but also a quality floss? This way, I can't afford to commit any mistake, because, as you can see in the photo above, after pulling the thread out, there's a clearly visible stain remaining! Even a waste knot leaves a faint stain, as you can see below!
After Cutting the Waste Knot
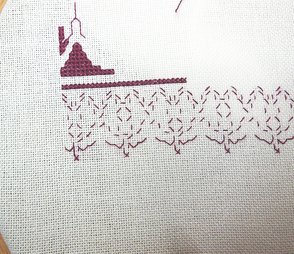
Solution: Thank goodness, there's the Needle'n Thread Facebook Community! The Ladies and Gentlemen over there are so helpful and supportive! After I made my complaints, it turned out, that it's not dye but "fuzz", i. e. the thread leaves tiny fibres on the fabric while pulling it through. And as I was lucky to learn, this phenomenon is known as crocking. It can be easily remedied by applying sellotape on both sides - or a clean white rubber, as I later found out. I like the rubber even more, because it works like a broom! 😃 Since then I've had no more problems with fuzzy residues. Just compare the third photo to the first:
After Applying a Rubber
- The Italian cross stitch went very well, albeit at glacial pace. It's the slowest stitch, since one x includes 4 stitches (normal and long-armed cross stitch 2, Montenegrin 3). But it stitches without a hitch, since every x is just an x, it doesn't extend over the following x as in the long-armed versions. It fits in very well in each corner, even if you have to apply sometimes a quarter cross stitch. Quite unlike the long-armed cross stitch. As I went on to the dolphins, I got a real problem: How to fit in the long-armed crosses when they meet a slanted outline?
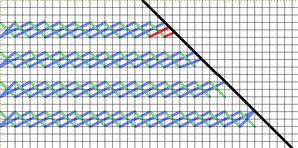
LACS at Slanted Outlines
Look at the diagram above: do you see what I mean? At a slanted outline, to keep the long arms parallel (as in the red lines), you would have to split the fabric thread, because they don't meet a hole. But splittling the fabric in a 32 ct. evenweave is very difficult if not impossible, at least with Jobelan or Murano, let alone Aida. The threads are too ... well ... "round"? It is as if you would split a dense rope. And the spaces are too narrow for me to see, even through a magnifier. In turn, the other three options depicted look either crooked or holey or crowded.
One lady in our Facebook Community proposed something like is shown in the diagram below, what, as she said, is also more or less how it was done in historical Assisi work. It would be a great solution, and I highly appreciated her answer, for I was also much interested in how they solved the problem in the past - if not ... well, if it didn't require splitting the threads as well!
The Correct Approach?
Solution: After several trials and "sketches" on a doodle cloth (well, it was the quite ample excess margin of my sampler fabric, to be honest), I finally found an acceptable solution. It is described in the stitchionary on this website. The lady said it's all about coverage in Assisi work. As a general rule, that's true, that's also why you normally use two strands of (typically silk, but I settled for cotton) thread. I had enough coverage with the Italian cross stitch and the Montenegrin stitch. The long-armed cross stitch with one strand, however, didn't result in a dense coverage. But then, I found the open-work effect especially adequate to the dolphin motif, because It gives an impression of water.
Lessons Learned
I had an epiphany: doing a sampler isn't so much about learning and applying new stitches - that's the job of the practice piece, actually. But assessing, measuring, calculating, organizing etc. a whole embroidery project - those are things you learn best by designing a sampler. It's about gaining experience en masse!
Being through with the annoying maths part, I did my first few stitches, when I noticed that I can't stitch with two threads, as usual in cross stitch. The Italian cross stitch is very dense, and the count of the fabric is obviously too high for using two threads. Moreover, in this case, the stitching went much easier after replacing the blunt-tipped needle generally used in cross stitch by a regular embroidery needle #7 (or #8 - the medium size from a combo pack with sizes 5-10). So I learned not to cling slavishly to the tradition; you just have to test various options and adapt the work to your own needs and ideas to get a satisfying result.
The Assisi Sampler
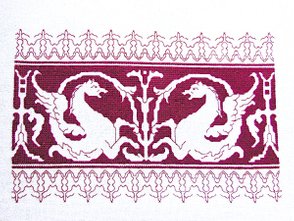
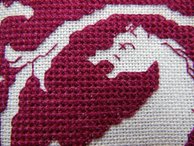
Here's the first motif: Burgundy without outlines.
Stitch: two-sided Italian cross stitch
Stitching time: 4 weeks
It was not until I saw the photo that I noticed the missing few stitches. Find the fault! 😃
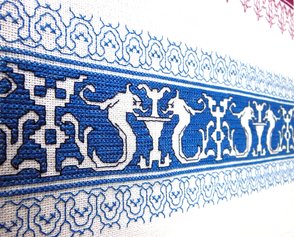
Second motif: blue with black (actually dark blue) outlines.
Stitch: long-armed cross stitch
Stitching time: 3 weeks
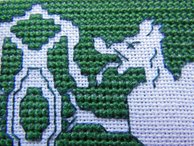
And here's the last one: green with dark green outlines.
Stitch: Montenegrin stitch
Stitching time: 4 weeks
Winged Horses
Dolphins
Winged Dogs
The whole sampler took me 11 weeks. That's very good compared to the Biedermeier cross stitch sampler, which took me 20 weeks. But I really don't care about the time. Curious: no matter what I'm embroidering, I just love it and I can completely immerse in the work, oblivious to space and time. Needlework is nearly meditative, as they say.
The Assisi Sampler
Dogs Close-up
Horses Close-up
Dolphins Close-up


