Click on the images to enlarge them!
March - July 2021
Needlepainting - 3 Tutorials
2021 was my Year of Tutorials. Apart from the RSN online video course in blackwork plus a stich a(very)long by The Steady Thread Blackwork SAL, I thought it would be very instructive to participate in the How to Embroider (Blank) tutorials offered by Mary Corbet on Needle'n Thread.
These tutorials weren't exclusively needlepainting, but they covered this technique too. Let's say they were free-style (surface) embroidery at its best.
Mary's purpose with these tutorials was to show how you can stitch a certain motif in very different ways. Appropriately enough, the first tutorial was called ...
5 Ways to Embroider Wheat
My first idea was: golden wheat would look great on a dark brown fabric! I had a sturdy dark brown cotton from a charity shop which came in handy for this project. I cut out a 30 x 30 cm (12" x 12") piece to fit into my 20 cm (8") Elbesee hoop.
I couldn't resist. In my transfer test run, I stated that I would rather not use the prick & pounce method. Luckily I did not say "never". Because when I bought my new Versatile Table Clamp (which I absolutely love!) from Sarah Homfray last November, I had also ordered a Prick and Pounce design transfer set. Which I just HAD to check out of course. It's a different story than home-crushed charcoal, after all.
Unfortunately the kit did not contain the promised picker, but I refrained from complaining as I have a #9 needle attached to a cork myself. I grabbed it and pricked the lines about every 5 mm. It's not easy to always hit the line exactly with the needle!
I pinned this finished "punch card" to the mounted fabric and rubbed the white pounce powder in. Then I traced the dots with yellow watercolour - or at least tried to. First with the very brightest yellow from Schmincke. You couldn't see anything, only the fabric got wet. Next I used lemon yellow from White Nights which worked better as long as the brush was relatively dry and had a truck load of paint on it. I had already taken the pastel pencils out of the cupboard, but then I preferred to stick with watercolour, because the pencils are also nothing but dust that disappears very quickly.
It was only after taking pics of the piece when I saw that the tracing with watercolour came out super clear. It just has to dry first to see something.
So, okay, with a bit of practice prick & pounce might be an option.
When putting the threads together, I discovered that I didn't own a single colour of those recommended by Mary Corbet. Sure, she wrote that you can easily use whatever you have or wish, but I had to swap the variegated thread (Colour Variations) for the stalks for Coloris. Coloris doesn't blend fine shades into each other as Colour Variations does, instead the colours are very different. In this case, I had to work the stalks in a mixture of brown, green, yellow and black, which is why they look as if they were suffering from take-all. Which is kind of natural, right?
"Rotted" Wheat Stalks
As I said, the tutorial is called "5 Ways to Embroider Wheat". These five ways refer to stitching the grains, while the stalks are done in stem stitch, the grasses in long-and-short stitch, and the awns in a single self-couching stitch.
The grains of the first wheatear to the left are worked in our much-loved lazy daisies. This was the easiest part.
The second ear is made of granitos. Not difficult either.
In the central wheatear the grains are stitched in padded satin stitch. Half of them is done in a darker colour in order to bring them more into the background. That was a relatively easy task too.
But now: bullion knots for the remaining two stalks, with the difference that the bullions in the second one from the right were surrounded by a detached chain stitch each, while the bullion knots in the far right wheatear are doubled, one of them hugging the other a bit.
Embroidering Wheat Grains Five Different Ways
Now I had never done a bullion knot before. Mary Corbet has a couple of nice tricks to facilitate that, the most important one being to use a milliner's needle. I followed all her advices, but professed myself unable to practically move the needle around the thread as she does. My needle remained stubbornly stock-still, so that instead I had to wrap the thread around it with my left hand.
After doing the first ear of bullions, I thought that bullion knots won't be among my favourite stitches. But afer doing the second one, I actually began to love them! I just was startled about how skinny they came out. Compared to the first two ears, these had become starvation grains! In the end, I realised the fault: I had just made them too long. Half of the length would have sufficed. So I unstitched the first ear and stitched it again.
I came to like the ear with the double bullion knots best of all. They are the closest to real wheat grains.
Here's the finished wheat, blocked and all. I really love my choice of a dark brown fabric as a background for the yellow embroidery. It makes them almost shine like gold! The only problem was the photography. In most of the shots was simply impossible to reproduce the colours and luminosity at least approximately true to the original.
Embroidered Wheat Blocked
How to Embroider Strawberries
Some time ago, I bought some Marabu textile watercolours at Hobby Welt Kreativ. The "funny" thing I noticed a couple weeks later was that the bottle supposed to contain blue paint was empty. They had sold me an empty bottle! I'm sure it was not intentional. I tried them for the first time on a blackwork practice piece, and I was delighted to discover that they are ideal for painting the ground fabric.
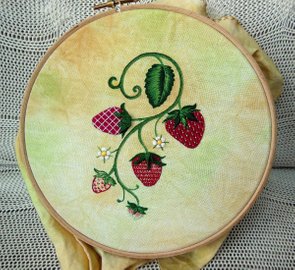
So while I used a dark brown cotton for the wheat, I decided to paint a white linen as the ground fabric for the strawberries. I used red, green and yellow on a wet fabric so that the paint could run and the colours could blend, and I intentionally wrinkled the wet linen up to give an interesting effect. I loved the result!
Painted Linen
On April 5 I began to stitch the first strawberry. It was the simplest one, done in stem stitch and fly stitch:
It's getting harder! Burden stitch is the name for the second one, and I have to say that this stitch does live up to its name. To top that the berry is at an angle so that it is very difficult to judge where to come out with the needle, where to guide the thread and where to put the needle in. However, after outlining the whole thing with stem stitch, it looked surprisingly good.
The method for embroidering the third strawberry was as follows: outlining it in split stitch, filling it with two layers of padding done with two strands, covering that with satin stitch, and covering the satin stitch with lattice work with pearl cotton. Again, the leaves in the back were worked with a stem stitch filling and those in the foreground as woven picots.
What was bugging me royally was that all those stitches almost didn't show at all at the backside, so that it was not a minor feat to start and end my threads invisibly. And there was a hell of a lot of threads to anchor!
I had to substitute the pearl cotton for the little couching stitches in the lattice work with two strands of floss, because I didn't have light green pearl cotton. To my sorrow, the lattice work, which had previously been aligned perfectly, got distorted by it in some places. It wasn't until in Mary's corresponding blog post that I read what she hadn't mentioned in the Patreon pdf: that you should rather make the couching stitches a little too long so that the latticework doesn't get distorted. After I pulled them out and couched it again with 3 strands, the whole thing actually looked much better.
Battlement couching! I had never done that before and tried very hard to get all the threads straight and in uniform angles. The light pink threads in the first layer were all perfectly parallel and equally spaced indeed - but in the end everything slipped apart in the middle. That was mainly because of the long leaves I had made so that I had to interrupt the thread lines a lot more frequently than the instruction was showing, and so the lines got more and more distorted with every new layer.
Battlement Couching, First Layer
When I finished it, the fabric could still be seen underneath almost everywhere and, to make things worse, my (anchoring) pin stitches too! I didn't want to unstitch the whole berry at first. I outlined it in stem stitch and thought I could let it pass. The leaves were done in fishbone stitch which went strangely well - maybe you remember that I hated fishbone stitch? I just wasn't overly sold to this kind of thread mixing, because the colours don't blend, so you always see the individual threads.
The last strawberry was fun and games! Needlepainting, fisbhone stitch, some seed stitches ... What a cutie!
Alternating with the strawberries, I was continually working on the little flowers and the stems as well. The flowers were done in padded satin stitch with some straight stitches between, the stems in stem stitch in different shades of green.
And now for the actual needlepainting: the large leaf: Mary hadn't been happy with her dark green in the middle of the leaf, left from the vein, and had replaced it with a medium green. I wanted to learn from her experience and used medium green straight away, but in turn I didn't like that at all. Now the leaf looked somehow flat and generally strange ... So I cut it all out again and put in a dark green - and look how great it turned out!
Embroidered Strawberries
I'm very happy with these strawberries. Not least with the painted linen. It all fits together beautifully and I think, after my front door, this is the second embroidery I'd like to hang on my wall.
... to be continued ...


