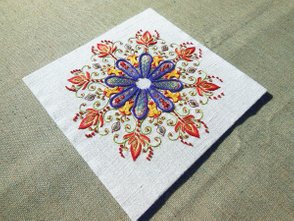
Ladies and Gentleman! I proudly present my First Stitch Along (apart from the abortive attempt with the Long and Short Stitch Lessons). Last year Mary from Needle'n Thread published an e-book with patterns of kaleidoscopes, and this January she set up a series of lessons for stitching one of them she calls Party in Provence. Of course I've jumped on the bandwagon. After all it's practice I need!
Click on the images to enlarge them!
January - April 2018
Fabric & Threads
As I began to stitch, I was happy to find some decommissioned white bedsheets. Enough for practice, I thought. Later, I bought a whole pack of different old fabrics at a charity shop and a flea market for just a couple of euros and a new piece of brown canvas at a drapery shop in Marienberg. (It was there, by the way, where the owner was delighted to meet another stitcher: "What type of machine do you have?" - "Machine? No, I'm in hand embroidery." - "You stitch by hand?!!") But all these fabrics are dyed. I needed a white one, and for this large project I wanted a good one. The old bedsheets are tightly woven (I assume it's cotton, but I'm not sure), but they are worn and the weave has come quite loose.
Zweigart Linen, DMC Thread & Cotton Backing
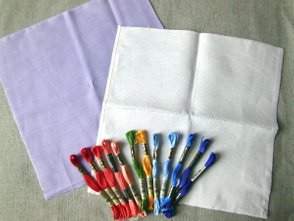
So I ordered my first new linen (Zweigart Newcastle 40 ct.) from Stickteufelchen, and while I was at it, I ordered the whole range of needed DMC floss as well. You can bet that I treat these goods like a treasure! I prepared everything as I've learned it from Mary: pre-shrinked the linen, cut it precisely with the grain, basted a crosshairs for centering the design, bound my largest 8" hoop, found a nice piece of lilac cotton for backing. And waited for the dressmaker's carbon paper to arrive, for the biggest challenge was the ...
Design Transfer
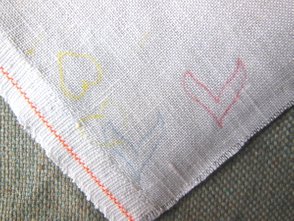
I tried them all! Well, nearly all, because the Prick & Pounce method seems to be unknown over here. That is, I could prick alright, but I can't get my hands on pounce powder. Tracing on a sunny window pane works quite well, but only with small designs, because your arms will quickly begin to wear out. The Prym iron-on pen doesn't become visible at all, basting on tracing paper is a pain in the neck with such a lot of tiny detail, and the dressmaker's carbon paper I picked up in the local needlework shop, well ... the white one didn't work on a dark material, the yellow one did become visible on white, albeit faintly. I figured, a darker paper could do the job, and ordered a package of red and blue Prym dressmaker's carbon paper.
Test with Dressmaker's Carbon Paper of Various Colours
It was January 19, when Mary Corbet had published already the second part of the stitching instruction, the carbon paper was a long time coming, and I was so desperate to stitch! So let's just do the darned transfer with ordinary carbon copy paper, as I did several times before! However, I was anxious to eventually spoil the good linen, hence I decided to switch back to my good ol' bedsheet and the cheap floss ...
The transfer result was encouraging: the lines went out nicely and precisely with no smudges anywhere. So why not use always carbon paper for transfer? It's the easiest and most reliable method, and with time you'll learn what lines are best avoided, because they won't be stitched over. The dressmaker's carbon arrived a week later, and I tested it on a corner of the Newcastle linen. It shows up quite recognizably, as you can see in the photo above, though the lines are not nearly so bold as with the ordinary carbon paper.
After the Transfer with Carbon Copy Paper
Addendum: A year later, I tried out the iron-on pen and the dressmaker's carbon paper once again, and the results were absolutely fine. HERE you can read about my test run with all possible transfer methods (except for basting).
First Experiences
After some stitching, I was beginning to notice the downsides of my material choice, as I went along. The bedsheet doesn't allow for very precise stitching, indeed, and I didn't back it, so as not to waste the good cotton. Replacing DMC with craft floss, I had to eyeball the colours and to use what I had in my stash, which makes itself noticeable especially in the long and short stitchted sections. The blues don't blend together very well.
The Beginning ...
I had a technical problem with the spacing of the lattice work and the lazy daisy flowers in the already filled areas. On Mary's advice, I cut out a strip of transparent paper with the spacing marked on the edges, but it helped only to a limited extent. The result were differently spaced lattice works and flower petals at irregular angles. I wonder how Mary managed her perfect flowers? She must have a protractor in her eyes, surely! 😮
Some Vexing Inaccuracies
As you can see in the photo below, the fabric is massively beginning to wear off. The weaving is gradually working loose, giving me an increasingly hard time in placing my stitches precisely. It gets pilled and begins to fray a bit.
Worsening Quality of the Fabric
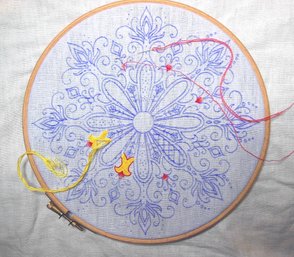
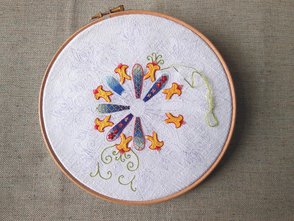
Here's the beginning of my major problem so far: The carbon paper transfer begins to fade! The photo below shows the progress as of February 5. Two weeks later, it had almost faded away, and I had to re-draw the design freehand ... argh!
Fading Design
In the Middle of the Muddle
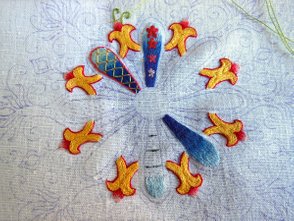
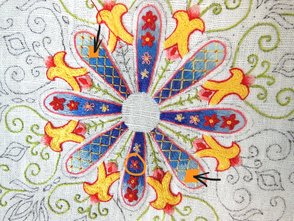
This is my progress as of February 22. As mentioned before, I had to re-draw the design freehand. I used a black Copic multiliner, size 0.1. Mary recommended to rather use a pencil, but it was already done - and badly done, as I have to admit. Obviously, the pen was too thick. The stitching doesn't cover it completely in many places. The trouble was that my 0.05 multiliner was nearly dried out. And you can see in the marked areas, where the pen slipped and left lines that will not be covered at all. 😞
The Re-drawn Design
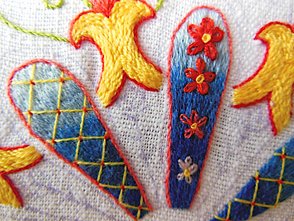
While we're on it, I've marked some of the mistakes I made. Apart from the irregular spread lazy daisies on top of the blue petals, you can clearly see the unevenly spaced lattice work: in one petal it's signifcantly narrower spaced as compared to the other three. For one little flower I picked the wrong colour, and the French knots, as much as I love stitching them, vary immensely in size and appearance. The latter is mainly due to the bad quality of the floss, which wears superquickly in spite of a relatively short thread (ca. 15"). However, considering the worn off fabric, I didn't dare to pick anything out.
My Sloppy Work
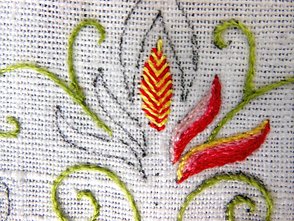
My apologies for the blurry photo below. It's a macro, and I don't have a tripod yet. Did I mention, that I don't like fishbone stitch? I seem completely incapable of keeping the angle straight.
Close-up of the Flames
BUT! - Even though it may not sound like that - I assure you, the whole project is heaps of fun! Must have my daily dose of it, and it seems to me the reason for it is that it is a SAL. And because it's colourful. And because I didn't do such a bad work, in the end, did I?
Approaching the Goal
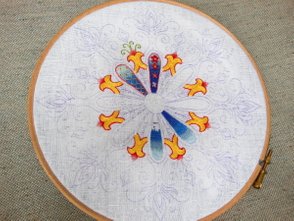
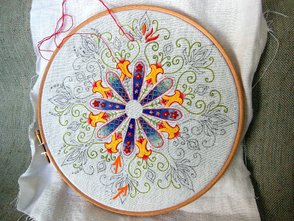
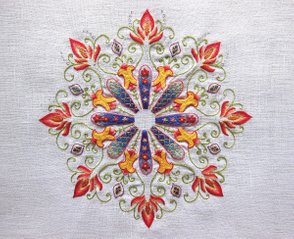
March 19: Phew! After approximately two months of stitching, I'm nearing completion! At least, the thread work's all done, now I'm only waiting for the instructions for putting the beads in place. There was plenty of new difficulties coming up in this last stage. First of all, the flames on the outside of the circle didn't stitch evenly. Some were wider and/or higher than others, meaning I had to vary the number of rows in every colour. The reason: They all were massively out of form because of the uneven drawing. I wondered why there should be such a difference between the transfer using a lightbox or carbon paper and the transfer using an iron-on pen, because - I mean, just have a look at Mary Corbet's drawing! It looks like printed! She uses a very good iron-on pen (which I can't come by in Germany). But maybe she's right: With an iron-on pen, you draw only on paper, without being bothered by the irregularities of the fabric.
All Stitching Completed!
The blue medaillons between the flames were a feast. I love satin stitch, and I love padded satin stitch, and here we had three padding layers at a time. Of course they, too, were starkly out of shape, but yet, when finished, I indulged in looking at them - they were neat and cute and shiny just like little jewels! Nevertheless, the satin stitching wasn't easy because of the loosened weave of my fabric. There were big holes forming in places where I had to put the needle several times in and out. The same as with the granitos in the long-stemmed flowers between the blue petals.
Flames and Medaillons
Last stitch done, I put the whole thing out of the hoop for ironing. And horror of horrors! Where the fabric was ironed (very carefully from the back, the embroidered areas resting on soft dishtowels), it turned yellow! As I figured out, it was - dust! (and perhaps dirt, too, admittedly ... *blush*) That's what comes of ignoring the advise of the teachers: always put your fabric out of the hoop for a longer lasting break! (Always wash your hands before stitching, yes, yes ... *sigh*) So I gave it a good wash - cautious, since I wasn't sure if the threads are colourfast - fortunately they are, as it turned out - and when it was nearly dry, I ironed it, blocking the fabric by hand. And looking at the result as it presently is ... well, doesn't look so bad at all, does it?
Washed and Ironed and ... Waiting for the Beads to Come 🙂
Let's Party!
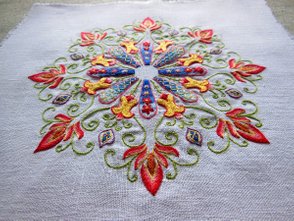
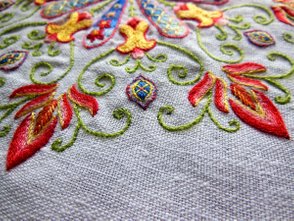
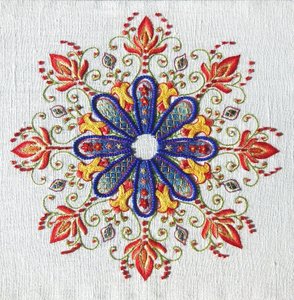
April 15: The last bead - the last stitch - after three months of tireless stitching (a quarter of the year, mind you!) my Party in Provence is finished! Done, finished, completed and all! YAY!!!
Stitching it was a party, no doubt, but ... as things turned out, beading is not really my cup of tea. A few scattered beads - no worries. But a whole truckload? Nope. Especially when strung in a chain like the blue ones around the petals.
But I'll tell you what: I have only a hoop - no frame, no stretcher bars, no stand. If I had my left hand free, it would be significantly easier to put the beads on neatly. That's my excuse for the crooked blue petal outlines, you see.
The Finished Piece
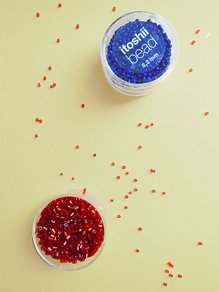
The blue beads were meant to be Miyuki beads, but alas, the lady in our local needlework shop hadn't even heard of such a brand (the few beads they carry are not worth looking at ...), and with an order via the internet the shipping would have cost me three times the price itself. So I landed in a craft store with quantities of really nice beads, where I bought a little box of Itoshii beads. Only they were a bit larger than the required Miyukis and non-transparent.
For the coral beads Mary proposed Mill Hill Magnificas, and I got them indeed at the same online shop where I ordered the linen and the DMC threads (which I didn't use in the end ...). Unfortunately, the Magnificas are so tiny, they didn't cover the ink drawings around the big "flames" at the outside. That's why I decided to use the Mill Hills at the ends of the green swirls only. Around the "flames" I used beads bought at a Creative Fair. They are relatively big chunks cut off of transparent plastic tubes, obviously, and accordingly unequal in size and with jagged edges. But they sparkle beautifully in the sunlight! (Unfortunately, the photo didn't capture it).
Beads Used
Top: Itoshii, Bottom: Cut Beads
Scattered Between: Mill Hill Magnificas
Now, it was said to sew the beads on using four strands of floss. However, my floss turned out to be too thick for that purpose. Maybe DMC is thinner than craft floss? So I switched to machine thread. Compared to floss, machine thread is quite untractable. That's why I won't show you the back... 😉 In many spots, it was impossible to pull the thread through below other threads ... and I really didn't feel like ending and beginning this mule of a thread very often.
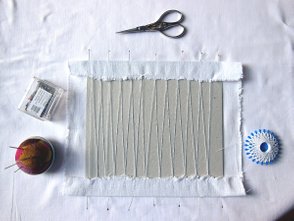
I don't intend to frame the piece: It was stitched poorly with poor materials, it's just a practice piece. But I wanted to try out mounting it on a cardboard. I ironed it one last time, cut the rear cardboard of a sketchpad to size, on which I centered the embroidery, then turned it all over, folded the fabric over the board and laced the opposite edges with twine. Unbelievable, what lengths of a thread you need for lacing only one side! It's hard to estimate beforehand, so I ended up using at least two threads on every side. But in the end I was surprised how well it worked out. The mounting at least was well done. - Oh, in case you wonder about the pins in the edges of the board: so wondered I, but they really did slip into a cardboard edge no thicker than 1-2 mm!
Lacing in Progress
That was my adventure with Mary Corbet's kaleidoscope Party in Provence. Hope you enjoyed it a bit. I certainly did. I've learned a lot in the process - but now, it's time for systematic learning. My actual apprenticeship is about to begin ...
Party in Provence


