Click on the images to enlarge them!
Filling Stitches
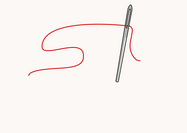
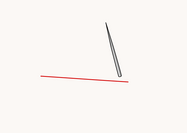
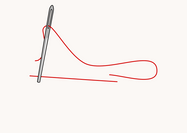
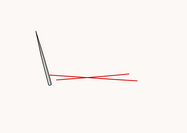
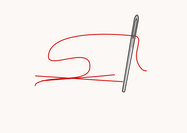
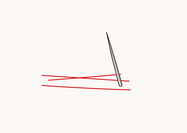
New England Laid Stitch
English | New England laid stitch, Deerfield stitch, self couching |
This stitch seems to be known in the English speaking world only, perhaps because it is said to be invented by early American settlers who were forced to economise on thread. It is a very nice and easy to execute filling stitch which reminds to a certain extend both herringbone stitch, couching and satin stitch.
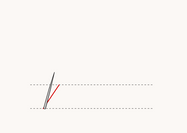
Begin by working a long horizontal stitch, sloped slightly downwards. Then come up right next to the end of the first stitch, but a bit inwards the line, from where you couch the first stitch down with a somewhat shorter diagonal stitch. And that's all. From here, you have just to repeat the first stitch sequence.
To obtain a nice dense filling, keep the stitches close together.
New England Laid Stitch
Satin Stitch
<<< mobile phones: drag the table to the left to see the whole entry <<<
العربية | غرزة الأطلس |
Deutsch | Plattstich, Flachstich |
English | satin stitch, damask stitch |
Español | punto pasado, punto plano, punto pasado plano |
Français | point de passé plat |
Italiano | punto raso, punto piatto |
Nederlands | satijnsteek, platsteek |
Polski | ścieg atłaskowy, ścieg satynowy |
Português | ponto cheio, damasco, ponto longo, au passé, point perlé, point passé, passé |
Pусский | вышивка гладью |
Svenska | plattsöm |
Türkçe | saten dikiş |
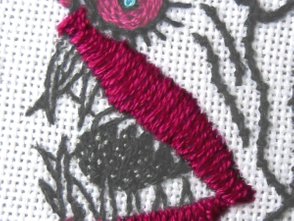
The satin stitch is the classical smooth filling stitch for smaller areas. It looks simple to execute, but it requires a bit of practice to place the threads parallel and close to each other without crowding them. The individual stitches should be no longer than max. 2-3 cm (ca. 1"). Longer stitches are susceptible to mechanical damage, they may quickly come loose or get wavy.
A well executed satin stitch looks best when worked with 1 strand of floss only. It's the only way to make sure the threads lay exactly parallel to each other in order to achieve a smooth, sheeny surface.
To get straight edges, work a split stitch row along the edges first. It will support your needle while stabbing in and out, and split stitch is best suited for this, because it yields the smoothest lines.
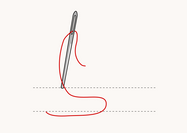
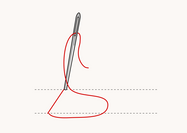
Next come up with your needle on one side of the shape to be filled, and go down at the opposite side. Practically, it makes no difference, whether you carry the thread across in a straight or a diagonal (as in the figure) manner. It depends partly on the kind of shape to be filled, but also on your personal preference.
Then pass the thread beneath the fabric to the starting point. Come up right next to the point where you previously came up, and put your needle down at the opposite side again, right next to the point, where you put it previously down.
Fill the whole shape by repeating step 1 and 2.
You may want to start your first stitch in the middle of the shape to be filled, working first towards one end and then, beginning in the middle again, to the other. This approach makes it easier to adhere to the general line orientation, since the first stitch works as a reference, from which you will never diverge too far.
Satin Stitch (in Colours) & Padded Satin Stitch (Brown)
Padded Satin Stitch
Deutsch | gehöhter Plattstich, unterlegter Plattstich |
English | padded satin stitch |
Français | point de plumetis |
Italiano | punto piatto imbottito |
Polski | ścieg atłaskowy wypukły, ścieg atłaskowy podścielany |
Português | ponto cheio com enchimento |
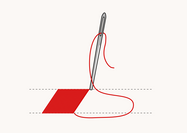
If you'd like to get a somewhat raised satin stitch filling, you can work a padding underneath. To do that, fill the area supposed to be raised with straight stitches close to each other. After having placed the satin stitch over it, the padding will no longer be visible, so it doesn't have to be worked perfectly. It should, however, be always perpendicular or nearly perpendicular to the direction of the satin stitch.
You can fill the area with as many padding layers as you wish, just remember, that the last layer has to be perpendicular to the layer of the satin stitch.
Credits for the multi-language stitch names:
agulhas da méri, Illustrated Glossary of Embroidery Stitches - 1
Dictionary of Stitches.docx - source unknown, please give me a hint, if you know something about the authorship (maybe an Italian blog?)
Mary Thomas's Dictionary of Embroidery Stitches
Pumora Embroidery, Lexikon der Stickstiche
KUFER z artystycznym rękodziełem
Ateljé Margaretha, Sömsätt
Marina Pastushenko
Mary Corbet, Needle'n Thread
Wikipedia


