Click on the images to enlarge them!
March - October 2020
Street Door #1
Get up and Fight!
Do you know the feeling, when you're overthrown by headaches for a long time so that you just cannot do as much as you would like? And a matter very close to your heart remains on a standstill? If you are like me, at some point you just cannot bear it any longer, and it comes to something I would call an emotional clearance. You get so angry with yourself (and your headaches), that you launch yourself headlong and with all your might on your project, pain or not.
That is what happened to me with my first architectural project, a street door. I was so angry, that I didn't even pre-wash and neaten the linen, just cut it out, swearing like a trooper, traced the outlines from my photo onto it on my makeshift lightbox, and mounted it on the largest hoop (25 cm or 10 ") of my seat frame and sat down to stitch. And lo and behold - the migraines were gone! Yay!
Since I don't have a stash worthy the name yet, and I was so desperate to finally start stitching, I had to choose among the floss colours I had on hand. Next time I would get to it more calmly, choosing the most matching colours and ordering them first, but for the first attempt I found it was okay. It was more important to me to figure out how I would stitch something like that in the first place.
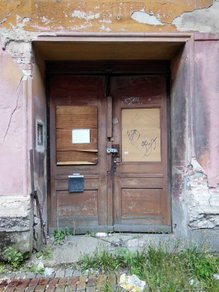
Street Door, Kaßberg, Chemnitz
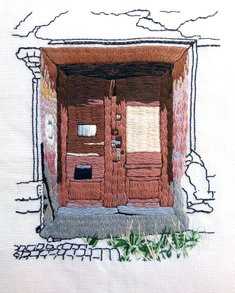
My plan was to fill the whole door including the wall opening with colour, while adumbrating the surrounding masonry by black lines only, like in an ink drawing.
Working my Way Through the Door
I began by stitching the upper horizontal part of the wall opening. It cost me some restarts to figure out the best stitch for it. I was stitching with Sublime Floss for the first time, and I wasn't sure if I like it. To my mind, it has a slightly tighter twist than DMC floss, hence it appears to be a bit thinner and "firmer", the result being a somewhat poorer coverage. The most annoying thing about it, however, was that it apparently isn't a pull skein. I had to pick apart most of the skeins from the beginning, resulting in a tangle and the messing up of the labels.
After some unsatisfying approaches with split stitch, long-and-short stitch, satin stitch and the like, suddenly the thought flashed through my mind: 'Self-couching would be much better'! I hadn't any particular stitch in mind, but there is a stitch, also called self-couching - it's the New England laid stitch. And it worked perfectly!
The Beginning - New England Laid Stitch
As you can see in the photo above, the wall opening is an agglomeration of colours. There is the cameo pink plastering, with large spots of a dark grey ... washout? plastering? ... there are semi-transparent ochre areas as in the plastering above the door, and light blue grey concrete smears towards the bottom, all unregular and mixed up as is usual in unoccupied and neglected buildings.
This is where my two-threads-approach came in very handy, so I could mix two colours in the needle, taking into consideration the shadows and - of course - the perspective. For most of the planes I went back to long-and-short stitch (which is a split stitch filling, actually), because all those patches should blend into each other as much as possible.
Wall Opening
When getting to the door itself, I noticed that continuing with two colours in the needle would make the pattern too busy, there should be a distinguishing contrast between the wall and the door.
Door Filling, Shadow
The sketchy lines around the door adumbrating the masonry are worked with 1 strand of black floss in backstitch.
I decided to fill in the threshold as well. This is concrete, a bluish grey, and I worked it with 2 strands in a split stitch filling, same as I did the door filling up to this point. After a while I noticed, that the fanned out filling looked strangely flat. There should be a tiny rounded off step of sorts at the front line. I resolved this by working little vertical stitches into this area.
Doorstep and Filling in the First Nailed on Plank
There are two planks nailed onto the door on both sides, you can see it in the photo. I tried the right one with one strand in Long-and-Short stitch, but it didn't please me at all. For some reason one strand didn't cover well. So once again I fell back on my approved Dictionary by Mary Thomas, and yes, indeed! She didn't let me down. Once again I found a fitting filling stitch: Roumanian couching.
What About Some Green?
As the work was finally finished after six weeks, I looked upon it, and behold, it was good. But not very good. Methought it could benefit from some green in the bottom right corner, as is in the photo, to balance the composition out and to add a bit of a contrast. But I wasn't sure.
Street Door Finished
The trouble when asking others is, that you can get widely differing opinions. Go for it, look what other people have to say about it, for sometimes you can pick up very valuable ideas. But in the end, it is you and you alone who has to make the decision. Because it's your work.
After reading umpteen of comments presenting a couple of valuable ideas, indeed, my decision was to put the photo of the embroidery into a graphic programme, create a new transparent layer and to draw in grasses as I imagined I would stitch them. The result looked thusly:
Street Door with Grass Sketched in
At first view I didn't like it. At second view I did.
As usual, it took me several months before I finally took on putting the grass in. I had to change the thread colours repeatedly. It wasn't for the first time that I observed this strange phenomenon: colour combinations always come across completely differently when embroidered than when you look at the skeins next to each other beforehand!
I was stitching it by eye, as I thought fit, without a pre-drawing, using any stitch that seemed fit: straight stitches, split stitch, backstitch ... As a very structured person though, I always have a really hard time creating a random arrangement. I was working with all three colours in one go, so that I didn't have to accidentally pass those in the background under those in the foreground, i. e. I was working "from back to front". But over time I got increasingly better at random stitching - one further proof that it's all just a matter of practice! Slowly I brought some variety into the stalks, not only directionally.
Finally and at long last - after another bundle of errant blades - I was able to declare the work finished on 27 October 2020.


