Click on the images to enlarge them!
December 2019 - February 2020
The Blobfish
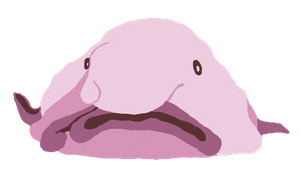
Have you ever seen a blobfish? I didn't until I caught one in the submarine on the night market in Stardew Valley, a wonderful video game. My first thought was that Concerned Ape had invented it as he invented a couple of other fish in the game. But no! The blobfish exists, as weird as it may seem! I just couldn't help but memorialise it in embroidery! So I sketched one out in Gimp.
Digital Sketch
Did you have a look at my apprenticeship curriculum? There was the idea to finish it with one self-designed work, stitched one by one in every technique/style of embroidery I had studied. Now, I'm not near the finish of my apprenticeship, but it can't hurt to already launch into this project. The blobfish is an easy enough design to execute in all relevant techniques and styles. And the first technique would be cross stitch.
Why Are You So Cross?
The digital sketch was there, now all that was needed was to change it into a cross stitch pattern. There are several free pattern makers throughout the internet, and most of them are very complex, which is a good thing. You can enter the number of stitches (width of the piece) and colours you wish to use. You can choose the palette (DMC, Anchor, Sulky etc.), the pattern style and much, much more. So I was of good cheer, believing that I just needed to upload my sketch and - abracadabra! - I would get a perfect cross stitch pattern.
But life is rugged. None of the pattern makers I had found was apt to spit out a decent pattern. They all added colours to monochrome areas, they all weren't able recognise the eyes, let alone the one x pupil, and, what was worse, they all falsified the colours. After countless attempts, modifying my sketch again and again, I was fed up. I realised that without making the pattern manually, I would get nowhere.
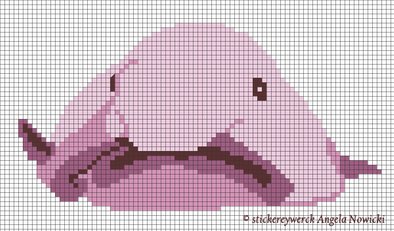
You know the bliss of finding a solution after a long and vexing quest? That was how I was feeling when I found out that Gimp has a grid tool included. I don't mean the auxiliary grid which won't be visible on the saved file, but a grid on a separate layer which remains part of the picture. And, better still, you can use the filling tool to fill every single square of the grid individually. It was a quite a lot of work, but it was easy, and it was a great feeling to have created a cross stitch pattern all by myself!
Self-made Cross Stitch Pattern
Now just filling the squares with little crosses! I picked a white evenweave cotton, Zweigart Linda 27 ct., and DMC floss. But I didn't have the colours I had in mind, I had to order them first. In the meantime, I stitched the fellow in a colour palette I had in my stash, a more orange pink than the purplish tones you see in the pattern.
Colour Stopgap
In the course of stitching, I noticed that it might be better to do the big areas first and only then the details, so that the latter would stand out better.
This first version was finished in the middle of January. I had to substitute the two darkest shades against two browns from MEZ Freiburg - a remnant of the Biedermeier cross stitch kit - because the purple was totally out of place. When I got around the eye in turn, I got the feeling that a green pupil would be more snazzy than this dull background pink. I simply stitched it over.
Version 1
In the meantime, the "right" colours had arrived, so I was able to seamelessly stitch the second version of the "cross" blobfish. It went smoothly. Within two weeks, the second version was finished - and here it is:
Version 2
When I presented it in our Needle'n Thread Community, I learned that the blobfish was sighted at the West coast of Canada, though a glance into Wikipedia taught me, that its natural habitat is found in the Southwest Pacific. I don't know if that is to do with the Global Warming? Maybe that's why he is so cross? In any case, I decided to call v. 1 the Warmwater Variety, while v. 2 is called now the Global Warming Variety. 😉
Blob of Assisi
The second embroidery style I was devoting myself to in my apprenticeship had been Assisi embroidery. To that end, I had to remake the cross stitch pattern in an Assisi work pattern. This would be relatively easy, if I hadn't merged the layers in the cross stitch pattern, when I had saved it as a jpg, not having saved the xcf file (Gimp) at the same time. Why, shit happens. My absentmindedness brought me a lot of additional work. Happily enough, I am an exceedingly patient and perseverant person (aren't we embroiderers all?).
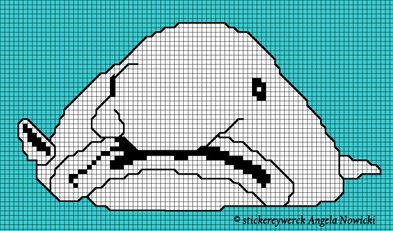
As a matter of fact, I had to cut the outer squares of the cross stitch pattern in half, so that they would create a slanted outline instead of a "pixelized" one. Of course, you can work slanted outlines in cross stitch, too, by using half crosses, but I didn't, and the outlines in Assisi embroidery are usually slanted, since traditionally you don't use simple cross stitch here. With the now built-in grid I had to cut the squares in half by manually drawing a diagonal line into every little square at the outline where a slant was supposed to be.
For better visibility of the pattern, I filled the fish in white (Assisi is a negative embroidery!) and the background in a lighter blue, so that it would be easy to count the squares to fill. I also remodelled the inner lines in black, since they would be traced in Holbein stitch or black crosses respectively.
The Assisi Work Pattern
In the middle of February, I began to stitch the fellow, that is his background, in dark blue (312) Montenegrin stitch. The fabric is the same cotton as in the cross stitch fish. This is gonna take me a looong while ... see how many crosses are to be made? Anyway, this is the beginning:
Shape Emerging
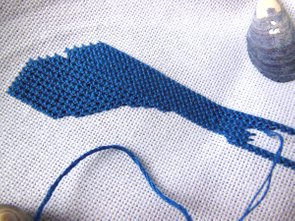
In the middle of March, while moving the hoop to the left side, I discoverd that the hoop is squeezing the stitches down, leaving an indentation in the embroidery. At first I thought that it came from keeping it in the hoop for too long, but after moving it, stitching the first three rows and unclamping it once again, there was the same indentation on the right side! So maybe I should bind my hoop? Which I did immediately. I couldn't assess whether it helped or not, since the hoop was located in the same spot as before. In order to be on the safe side, you better don't move your hoop around a Montenegrin stitch.
You can clearly see the mishap in the photo below.
Hoop Indentation
Next insight: When it comes to Montenegrin stitch, you have to work it from start to finish over the whole row. If you start the row somewhere in the middle, filling the first part afterwards, the junction will be visible.
Early in April, the right side was complete, and I was drawing near the end of the left side, as it turned out, that both sides didn't come together. Somewhere I must have been misdone something. I spotted it almost at first glance: fairly high up on the right side, I had stitched five rows of the diagonal instead of six. If I had compensated the height difference adding one more row at the bottom, it would have looked odd.
So what did I do? As usual: I began pulling threads. After a while, I startled: what are you doing here? How long do you intend to work on it? Are you nuts?
The answer came straightaway: meditation, babe! The mandalas of coloured powder come to mind, the ones that the Buddhists work so meticulously, only to destroy them as soon as they are finished. That is what drives a Capricorn into a frenzy. And that is exactly the right therapy for those characters. So I began to meditate ...
Blob of Assisi
I was meditating till mid-June. By then, Blob of Assisi was done. And so was I. Meditation is a fine thing, but working one and the same stitch for months on end is nothing but tedious. Now I don't feel like doing one more blobfish in Colbert embroidery anymore. I think, the one-design-in-all-techniques-and-styles thing got ditched.

