Click on the images to enlarge them!
February - May 2019
Making a Needlecase
Here's the Million Dollar Question: What is embroidery good for?
Well, to decorate things, right? Such as clothes, bags, household linens, gift wraps, greeting cards ... or even to create decorative objects, such as jewelry or pictures to hang on the wall.
Alright, but you know what? I embroider for the sake of embroidering - by and large. I'm sure there's many of you fellow stitchers out there, who feel just the same as I do: we love embroidering for the sake of doing it, don't we?
By and large. Sometimes yet, when we've accomplished something really nice, we begin to feel a certain disquiet. Wouldn't it be a shame to hide yet another piece to a file folder for no one to see? And we find ourselves musing about what we could do with the piece.
Such was my situation recently with this Colbert Practice Piece. The notion came up while still stitching it: I could make it into a needlecase.
I had started embroidering with one variety pack of Prym embroidery needles, sizes 5-10. Now, almost 18 months later, I found I eventually needed a really good needle stash. I wanted quality needles. And I've got them for my last birthday: embroidery, chenille and tapestry needles by Bohin, milliner needles by John James, all of them in various sizes. And my needles badly need a home ... I think they have the same love of order and clarity as I do (ascendant Virgo, I tell you!).
Chasing Down Supplies
In the middle of February, after finishing the practice piece, I went on the search for a suitable felt for lining. It was quite a bit of a quest. All I could chase down in the internet was either too floppy or too thick or too expensive. Or I didn't like the colour.
The trouble with buying locally is, that in our city (with a quarter million residents, mind you), there is a sewing shop, a knitting shop, two craft shops (of which I know, anyway) - and there was an embroidery shop, which closed earlier this year for lack of a successor for the retiring shopkeeper. The next big city, Leipzig, with half a million residents, has also only one needlework shop left. It's a shame, all the more as the shopkeeper was behaving cocky and didn't seem to care at all about her clients.
As it is, it is hard to come by embroidery items locally. The sewing and the knitting shops don't carry them. The craft stores sometimes carry some threads, mostly of unknown brands, sometimes they don't. I had unexpected luck in one of the local craft stores, where I got two big pieces of felt, 4 mm (0.15") thick, in dark green.
I cut it to the desired size, and hemmed the Colbert piece to the same size.
Embroidered Fabric, Hemmed
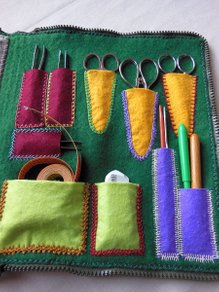
It will be a huge needlecase: 45 x 26 cm = 17.7 x 10.2"! But it should be. I was pleased with the notion to store in it not only all my needles, sorted by type, brand and size, but also my three embroidery scissors, three tweezers, four various crochet hooks, the tailor's tape plus the rubber and/or the bobbin with basting cotton.
From Within ...
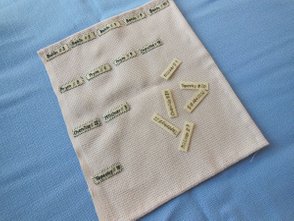
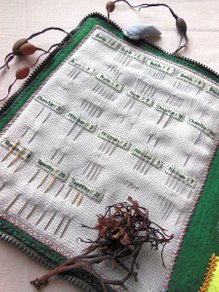
First I found myself a piece of a very soft Aida (not sure if this is Aida proper, a downright floppy counted fabric, anyway), perfectly suited for sticking needles in, and cut out and labelled 18 tiny felt pieces for each needle type and size ... but I couldn't help it: they looked so scabby labelled with ink - I simply felt the urge to stitch them - and so I did. With one thread of dark green DMC floss in stem stitch. Without my magnifier lamp I would have been stymied.
Needle Cloth with Labels
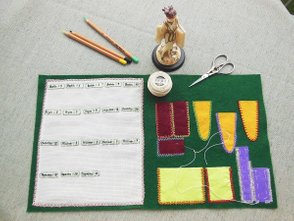
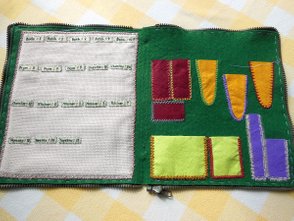
The needle cloth covers the left side of the needlecase. As you can imagine, it was a stiff piece of work, which took me several weeks to finish. The right side of the needlecase was the fun part: cutting out all the different tool pockets from a thinner craft felt of various colours, placing them exactly so that everything would fit nicely, and stitching them on with pearl cotton of various colours and in various fancy stitches. It was exciting to do surface stitches again, after so many months of working almost entirely counted emboidery! Stitching neatly with pearl cotton through two layers of felt, without a weave for orientation, however, was an arduous task. But in the end, every well-made pocket made me all the more happy.
The needle cloth got stitched to the felt with double herringbone stitch. I admit, I'm quite pleased with the outcome:
Felt Inlay, Nearly Finished
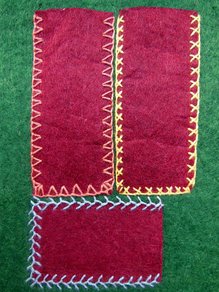
The pockets in the photo below are for the tweezers. The left one uses closed buttonhole stitch, the right one crossed buttonhole stitch and the lower one feather stitch.
Tweezer Pockets
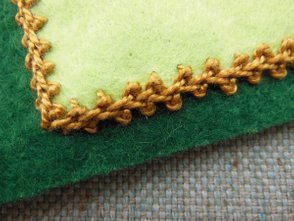
Below these three, there are two larger pockets. The largest is meant for storing the tailor's tape (or the basting cotton). It is sewed on in Spanish knotted feather stitch. All chosen stitches came from Mary Thomas's renowned Dictionary of Embroidery Stitches. The Spanish knotted feather stitch was new to me. Alas, I have to say, that Mary Thomas's book doesn't live up to my expectations. There are more than 400 stitches in it, to be sure, but every stitch is described by one diagram only, and the drawings aren't really clear (which is especially vexing when it comes to more complicated stitches), while the written instructions, all of them involving a few sentences only, describe the process in an equally superficial way. In the end, I had to resort to Google and Mary Corbet's outstanding and detailed How To Videos on Needle'n Thread again. The Spanish knotted feather stitch is not an easy stitch to work, all the more on thick felt, where you have to stab the stitches instead of sewing them. I had to re-work the pocket several times to sit straight and look good in the end.
Spanish Knotted Feather Stitch
The smaller pocket right next to it is designed for my much-valued rubber (I use it for removing tiny fibres from the fabric after unstitching). The stitch used is closed feather stitch.
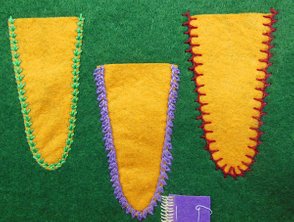
Next up are the three scissor pockets. The left one is done in fern stitch, the middle one in petal stitch, the right one in open Cretan stitch.
Scissor Pockets
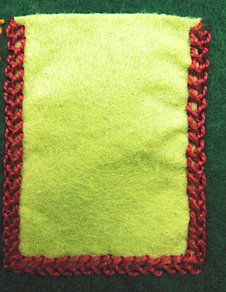
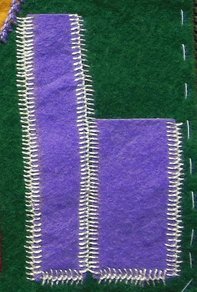
And last (and maybe least): two longish pockets for various crochet hooks, both done in Cretan stitch.
A New Home for my Crochet Hooks
... and Without
All the while, I was envisioning to sew the Colbert practice piece to the felt inlay with a dark green pearl cotton #5 in buttonhole stitch. So, after finishing the inlay, I began to do exactly that. It was a nice plan, because I could count the threads of the Murano (Jobelan) for spacing, and I was really pleased with the whole look ... until ...
... until the issue of a closing solution came up. I was considering to make a tongue out of felt, closed with a large button ... better still, maybe, two tongues, because of the size of the needlecase ... but I recognized, too, that it would be an arduous task to sew through two layers of 4 mm thick felt ... and how should I sew on the button so that the stitches wouldn't be visible on the inside? Then I thought of an elastic thread instead of a felt tongue ...
... and then a lady at the facebook group suggested using a zipper. Oh yes, it's a zipper I would like best! I didn't know exactly how to manage sewing a zipper in, but I wanted to give it a try. The whole length was 70 cm or 27.5". The whole problem was, that I couldn't find a nylon coil zipper of this length - the longest ones were 50 cm long. 70 cm long zippers were available as plastic zippers in bigger sizes only, those thick and huge ones, if you know what I mean. Sure, I might have tried to divide the length, sewing in two nylon coil zippers of 35 cm length each, which would meet in the middle, but I had jumped the gun purchasing one of these coarse plastic zippers, and I wasn't in the mood to waste € 10 for a zipper I wouldn't need for any other purpose. First baste it, I thought, and then we shall see.
What I saw after basting the zipper, was more than satisfying. It fitted. It looked good. And most important, it worked perfectly! And even though it was a separating zipper (there hadn't been closed ones in this length available, either), there was no problem inserting the insertion pin into the retainer box (you see, I did a bit of research on the zipper anatomy 😉). All went easy, so I could happily sew on the zipper to the felt.
Basted and Partly Sewed in Zipper
As usual, I sewed it in by hand. My "new" sewing machine, doesn't work properly, and my "Old Lady" wasn't in use for many years now, so that setting it up would have taken a lot of time. Aside from that, I don't even know if there's a zipper foot for it.
Last step was stitching on the practice piece to felt & zipper. My favoured blanket stitch had to be discarded now, since pulling threads over the edge would have disenabled the zipper. For a time I thought about whipped running stitch - until I found a stitch in Mary Thomas's Dictionary, called Paris stitch. It's basically a backstitch with perpendicular branches that looks a lot like blanket stitch. It is perfect for counted fabric, and that's what Murano (Jobelan) is. I just had to turn it around so that the branches pointed to the edge of the needlecase.
Sewing the practice piece to the felt plus the zipper with pearl cotton #5 went slooowly ... I guess that every little square took me more than a minute. Since I can sit over my needlework in 30 minutes stretches only, this last part of making a needlecase was dragging along for several weeks.
To Sum it up
I have learned something, if only a couple new stitches: closed buttonhole, crossed buttonhole, Spanish knotted feather, closed feather, petal, Cretan, open Cretan, Paris stitch ... As to the herringbone, feather and fern stitch, I knew them before, but didn't make use of them in a project yet.
All my Needles ...
... and Tools
And nooowww ... TA-DAAA! I've got a brand new needlecase! 😀 I can't even tell you how I was indulging myself in arranging all the needles and tools! ... I have to admit, that not all is just sunshine and roses, though - the scissors drop out of the opened needlecase, if I keep it carelessly atilt. I have to find a solution for them. I think I will make tongues with press buttons to keep them in place. Someday. For now I'm delighted to have a nice needlecase with all my needles and most important tools in one place and order.
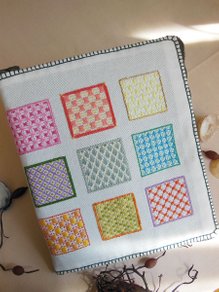
Needlecase Front Side ...
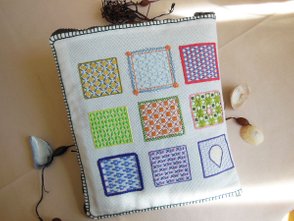
... and Back Side

